Monday, December 27, 2010

Drop Ship SO Cycle in Oracle Order Management (Part 2/5)

In this part, we will walk through needed steps to implement Drop Ship SO Cycle in Oracle Order Managements:

1)Create Item
-Navigate INV > Items > Master Item
-Enter Item Name and Description
-Apply 'Purchased Item' template then confirm the attribute Customer Ordered and Customer Orders Enabled are checked.
-Assign Default Buyer and List Price in Purchasing Tab


2)Create Price List for Item or Add to Existing Price List
-Navigate Order Management > Price List > Price List Setup
-Query Price List then add new line for Dropship Items


3)Create PO Buyer
-Navigate HR > People >
-Define Employee
-Navigate PO > Setup > Personal > Buyer


4)Set Profile Options
-Navigate System Administrator > Profile > System
-Query up profile: "OM: Population of Buyer Code for Dropship Lines
  + Set the profile value to Null: system will retrieve the buyer information from the Master Item
  + Set the profile value to Order Creator: system retrieve the buyer information from the employee id creating the Drop ship SO (in Order Management) responsibility


OracleValues Teams

Thursday, December 23, 2010

Merry Christmas and Happy New Year !

Merry Christmas and Happy New Year to all, 

Christmas is a lovely time of year, I am to spend time with friends and family. And I hope you have a nice day on Christmas Day. I hope that Santa is good to you as well and He brings you lots of presents on Christmas Day.


I hope the New Year brings you loads of Happiness and Good Health. And of course, eating lots of nice foods and candies.

OracleValues Team

Monday, December 20, 2010

Internal Order Process Notes

In Internal Order Process, there are some note you need to know:

1-After run "Order Import Request", Sales Order had been created:
  • The Sales Order Type being chosen from Purchasing Options (Navigation: PO > Setup > Organizations > Purchasing Option).
  • The Sales Order line Schedule Ship Date is coming from the Internal Requisition Need-By Date.
  • The Unit selling price gets passed from the Internal Requisition or item cost from the source organization.
  • Sales Order lines are always created with Calculate Price Flag as 'N'. You can forcefully changes the Calculate Price Flag to 'P'.

2-After do the Ship Confirm for the Sales Order. You change to Purchasing Super User for receive the quantity that is delivered on the Internal Requisition but can not find Receiving Transaction. This error may occurs when default SubInventory is not defined in the destination Org. To fix this error do the following steps:
  • Query the Item in the Item Master, Move to the Receiving Tab and enter a Default Receiving Subinventory in the lower-right corner.
  • Then, navigate to INV > Transactions > Transaction Open Interface, find the Item Error
  • Select the record in error, choose 'Submit' checkbox and save.
  • Finally, run the 'Inventory interface transaction manager' for process the record using the new default SubInventory.
OracleValues Team

Wednesday, December 15, 2010

Drop Ship SO Cycle in Oracle Order Management (Part 1/5)

1)What is “Drop Ship” ?
Drop Ship is a method of product delivery which the vendor accepts payment for an order, but the buyer receives the product(s) directly from the manufacturer. In a drop shipping arrangement, the vendor will be a middleman between the manufacturer and the buyer. The profit in this transaction is come from difference between the wholesale and retail price of the items sold.

2)Drop Ship in Oracle Order Management
Order Management  allows you to create Drop Ship SO which means you can receive orders for products that do not have in your inventory and you have a vendor provide the products directly to your customer.


3)Flow of  Drop Ship Sales Order
  (1). Create SO
  (2). Book SO
  (3). Progress SO
  (4). Release Purchase Order (Purchase Release concurrent)
  (5). Import Requisition / Auto create Purchase Order (Purchasing response)
  (6). Receive the material against purchase order
  (7). Invoice creation in AP
  (8). Invoice creation in AR
  (9). Complete line and Close Order

4)Benefit of Drop Shipment Order
Drop shipping is very useful for smaller retail shops, internet-only storefronts and those who primarily use catalogs for sales. A representative product may be displayed on the store's shelves or pictured in its catalog, but the actual product purchased may be sitting in a factory 1000 miles away. The following are some benefit of this method:
 + Do not need inventory
 + Reduce flow times
 + Elimination of losses on non-sellable products.
 + Reduced shipping to customer
 + No need packing and shipping costs.
 + Vary your product to customers.

OracleValues Team


Tuesday, November 09, 2010

How to using Dual UOM in Oracle Order Management R12

Some case business, we purchase items in 1st UOM and need to receive/issue them in a 2nd UOM. In this post, we explain how to setup Item use dual UOM (Unit of Measure) for create Sales Order in Oracle Order Management (Oracle R12):
 1) Create new Item
   - Navigate to Inventory > Item > Master Item
    - Note that Defaulting is set to "Default"

 2) Define conversion between 1st UOM and 2nd UOM of this Item
  - Navigate to Inventory > Setup > UOM > Conversion
 
 3) Create Sales Order
  - Navigate to Order Management > Order, Organizer > SO
  - Because we set Defaulting value to "Default" in step 1, so when we input the Quantity, its auto calculate the Second Quantity use the UOM conversion defined in step 2. If you want to change default quantity value, enter and choose "No" when the message appear.


OracleValues Team

Sunday, October 24, 2010

Can not import Internal Requisition to Oracle Order Management

When working with Internal Order Process, I had met the following error:
1-Create Internal Requisition and Approve it.
2-Run "Create Internal Order" concurrent request
3-Run "Order Import" concurrent request in Oracle Order Management module.
4-Use Order Organizer  to find Internal Sales Order that created, but can not found.

I had do step by step below to track and fix this issue:
a)Check the data of Internal Requisition in interface table, I use these SQL:
SELECT orig_sys_document_ref
FROM oe_headers_iface_all
WHERE order_source_id = 10
AND orig_sys_document_ref IN( SELECT requisition_header_id
   FROM po_requisition_headers_all
   WHERE segment1= '&IR_num');


SELECT orig_sys_document_ref
FROM oe_lines_iface_all
WHERE order_source_id = 10
AND orig_sys_document_ref IN( SELECT requisition_header_id
  FROM po_requisition_headers_all
  WHERE segment1= '&IR_num');


After run those SQL, the result is no row, so there is no date on interface table

b)I run the following SQL to check the Internal Requisition already import to Sales Order or not?
SELECT 'Exists in OM main'
FROM oe_order_headers_all
WHERE order_source_id =10
and source_document_id in ( SELECT requisition_header_id
  FROM po_requisition_headers_all
  WHERE segment1= '&IR_num');

SELECT porh.segment1 purchase_req, ooh.order_number sales_order,
ool.line_number so_line_no, porl.line_num pur_req_line_no
FROM oe_order_headers_all ooh,
po_requisition_headers_all porh,
po_requisition_lines_all porl,
po_req_distributions_all pord,
oe_order_lines_all ool,
po_system_parameters_all posp
WHERE ooh.order_source_id = posp.order_source_id
AND porh.org_id = posp.org_id
AND porh.requisition_header_id = ool.source_document_id
AND porl.requisition_line_id = ool.source_document_line_id
AND porh.requisition_header_id = porl.requisition_header_id
AND porl.requisition_line_id = pord.requisition_line_id
AND ooh.org_id = posp.org_id
AND ool.header_id = ooh.header_id
AND ool.orig_sys_line_ref not like '%OE_ORDER_LINES_ALL%'
AND ool.source_document_line_id is not null
AND porh.segment1 = '&IR_num';

Its still no record, that mean this Internal Requisition has not been imported and not in interface table yet.

c)I don't know why this internal requisition can not import but the transfer flag is set to 'Y'. I tried to update this Flag and run process again (Recommend do this in Test Instance first):

UPDATE po_requisition_headers_all
SET transferred_to_oe_flag = 'N'
WHERE requisition_header_id = '&req_header_id';

Run the 'Create Internal Orders' again.
Run the 'Order Import Process' then check the Sales Order had been created.

OracleValues Team

Friday, October 22, 2010

Can not enter Item in Price List

That is my experience, first-time I setup new Ledger, new Operating Unit, new Inventory Organizations, new Items. After that, I had been test my setup: create Purchase Order, do Receipt of Purchase Order, create Miscellaneous Issue transaction,... everything work fines. But when I test with Oracle Order Management module, I had a problem with create Price List, I can not create Price List with Item, can not enter Item in OM Price List.
After check all again, I found that I had lost one step: setup system profile "QP:Item Validation Organization":
  • Navigate to System Administrator > Profile > System

  • Query on QP%Item% then select Master Org for this profile value. 

  • Save, complete step
 Sometime, we can not enter value for this profile option. We can fix this error by setting the Profile options "HR: Business Group"

OracleValues Team

Thursday, October 14, 2010

Internal Order Process Step by Step

After complete setup for Internal Order Process on Oracle EBS R12, We can walk through the following test flow: 


Step 1 - V1 Purchasing - Creating the Requisition
Navigation: V1 PO> Requisitions > Requisitions
  • In the Type Field - Enter Type to Internal Requisition
  • Click into the Lines Region on the Item field then Enter Item OVT_Internal_Order1 with Quantity 500
  • In the Destination Inventory Organization: Seattle Manufacturing
  • In the Location field: M1- Seattle Mfg
  • Approve the Requisition
Step 2 - V1 Purchasing - Submit the 'Create Internal Orders' process
Navigation: V1 PO > Reports/Run

  • Single Request - execute the request - 'Create Internal Orders'
This process is responsible for inserting data into the Oracle Order Management interface Tables.  One of the fields that is inserted is the location_id - and because Order Management uses Customers rather than locations  - this is why it is mandatory to assign the Internal Location to the Customer.  The location that is passed from purchasing  is correlated to a customer so as to allow the  Order Import to run successfully.


Step 3 - VS Order Management - Import the Internal Sales Order
Responsibility: Order Management Super User

Navigation:
OM > Orders, Returns > Import Orders > Order Import Request
  • Enter the parameters: Choosing Source Internal and Order Reference is the Requisition Number had been created before.
  • Submit the request and confirm it completes with success
Navigation: OM> Orders, Returns > Order Organizer
  • Enter Source Type is Internal then enter the requisition number
  • Choose Find and the Sales Order is presented - which confirms the order was imported
  • The corrections form should be used to confirm if any errors have occurred during the import if the sales order is not found

Step 4 - D1 Shipping - Execute Pick Release against the Sales Order
Navigation: OM > Shipping > Release Sales Order

  • Move to Inventory tab - and choose the source inventory organization
  • Enter the Internal Sales Order number - and adjust the ship dates to include the ship date on the order line
  • Move to the Shipping Tab - choose Yes for Autocreate Delivery and Auto Pick Confirm 
Choosing these settings will conduct the move order transaction automatically.
  • Choose Concurrent and Confirm the Pick Release process has completed with success
The pick release process is responsible for moving the quantity from the sub-inventory (selected during the miscellaneous transaction earlier) for the Source Organization - to the Staging sub-inventory.

Step 5 - D1 Shipping - Confirm Shipment of the goods
Navigation: OM > Shipping > Transaction

  • Enter the Internal Sales Order in the field 'From Order Number'
  • Choose Find and then move to the Delivery Tab
  • Next choose Ship Confirm from the actions and then the GO Button
Step 6 - M1 Inventory - Receive the goods
Responsibility: Purchasing Super User

Navigation: Receiving > Receiving Transactions Summary
  • Choose the Destination Inventory Organization
  • Change the source to Internal and enter the Item Number - choose transactions - and Click find 

Step 7 - D1 Inventory - Create Intercompany AR Invoice
Responsibility: Inventory
Navigation: Reports/Run

  • Single Request - execute the request - 'Create Intercompany AR Invoice' 
  • Run AutoInvoice in AR Vision Singapore(AR > Interfaces > AutoInvoice) if you had not setup it run automatically.
Step 8 - M1 Inventory - Create Intercompany AP Invoice
Responsibility: Inventory
Navigation: Reports/Run
  • Single Request - execute the request - 'Create Intercompany AP Invoice' 
  • Run the request - 'Payable Open Interface Import'.
This completes the steps for the internal order flow.

OracleValues Team

Wednesday, September 29, 2010

Setup Internal Order Process

This post will guide thought how to setup an Internal Order Process in Oracle Order Management and Oracle Inventory.

1-Create Item
-Navigate to Inventory -> Items -> Master Items
-Select organization V1 (Vision Operations)
-Enter Item Name and Description (starting with OVT as initials)
Item : OVT_Internal_Order1 
Description : OVT Internal Order Flow 1
-Go to Tools -> Copy From: Apply the 'Purchased Item' template 
-Go to the Order Management tab and select the checkbox for Internal Ordered 
Internal Orders Enabled
-Save the record
-Go to Tools -> Organization Assignment -> Check M1 and D1
-Save the record
2-Internal Customer Setup
- Navigate to Customers -> Standard
    Enter the following search criteria and click on Find
    Name : Vision 
    Customer Number : 1021
- Click on Customer row
- Place cursor on the customer address starting with 3455 108th Ave., Seattle
- Click on that row
- Select the Business Purposes tab


- Place cursor on the Usage field Ship To and click Open
- Verify the Salesperson as No Sales Credit
- Notice the following information on the internal block (see screenshoot below) 
    Location : M1- Seattle
    Organization : Seattle Manufacturing
 
This setup is to map the customer address to an internal receiving organization. An internal sales order will appear like a regular order, however actual shipping to an internal organization (in this case M1) is done by creating this association.

3-Setup Shipping Network between Inventory Organizations
- Navigate to Inventory -> Setup -> Organizations -> Shipping Networks
- Click on Find
- Place the cursor in the D1 to M1 row (this row will already exist in a Vision environment) and verify the following or make changes where needed. 

    Transfer Type : Intransit
    FOB : Receipt
    Receipt Routing : Standard
    Internal Order Required : checked
- Save the record if any changes were made


4-Define Inter-Location Transit Time
- Go to Inventory -> Setup -> Organizations -> Inter-Location Transit Times
- Go to View -> Find and enter 

     Origin Type : Location
     Origin : D1- Singapore
     Destination Type : Location 
     Destination : M1- Seattle
- Enter the Ship Method and Intransit Time such as :
     Ship Method : DHL
     Intransit Time : 7
    
Default Method  : check
5-Open Inventory Accounting Periods
- Go to Change Organization and select M1 or D1 as necessary
- Navigate to Inventory -> Accounting Close Cycle -> Inventory Accounting Periods


- Verify if the Sysdate is in an Open accounting period, else open the same by clicking on the button Change Status, and clicking ok to the question "Open this Period?"


6-Create On-hand for Item in Source Inventory Organization
- Go to Change Organization and select D1
- Navigate to Inventory -> Transactions -> Miscellaneous Transaction
- Create a miscellaneous receipt transaction with the following information
    Item : OVT_Internal_Order1
    Subinventory : FGI     UOM : Ea     Quantity : 1500     Account : Select the account alias Miscellaneous (01-580-7740-0000-000)
- Save record
- Navigate to Inventory -> On-hand, Availability -> On-hand Quantity and verify the on-hand quantity for the item


7-Define Transaction Type and Order Source in Purchasing setup

- Navigate to Purchasing -> Setup -> Organizations -> Purchasing Options
- Click on the Internal Requisitions tab
- Notice the Order Type and Order Source setup

    Internal Requisition Order Type : Mixed (The internal sales order in OM will be created with this order type)
    Internal Requisition Order Source : Internal (The internal sales order will be imported into OM with this order source

8-Define Inter-Location Transit Time
- Go to Inventory -> Setup -> Organizations -> Intercompany Transaction Flows

- Click on Intercompany Relation


OracleValues Team

Thursday, September 23, 2010

Common Error in Oracle Shipping Execution (packaged with Oracle Order Management) - Part 1/2

In Order to Cash Cycle, data flows from the Sales Order object in Order Management to the Shipping tables, like Deliveries and Delivery Details, then to the Oracle Inventory tables where the transactions are recorded, like Move Orders and Material Transactions. This post present some common error that cause process failed and how to troubleshoot the issues from a Shipping perspective.

ERRORS DURING PICK RELEASE STEP
1-No default stage Subinventory
In Pick Release step, a stage subinventory is always required
Solution:
- Order Management super user. 
- Navigate to Change Organization, and select the organization for which you are defining the staging subinventory.
- Navigate to shipping->setup->Shipping parameters
- Go to the Pick Release tab
- Select a default Stage Subinventory in the field Staging. The default staging subinventory must not be the same as the subinventory from which the items will be picked.
- If locator controlled items are being shipped,  the Staging subinventory must be defined as having locator control.

2-No Subinventory picking order is defined
Solution:

Use either options A, B or C.
A: Specify a subinventory in the "Pick From" region of the Release Orders for Picking form, inventory tab.
If this is done, pick release will always pick from that subinventory.  However, if the specified subinventory does not have sufficient quantity, pick release will not consider any other subinventory for picking.

B: Define a defaulting rule for subinventory.
1. As the Order Management super user, navigate to setup->rules->defaulting.
2. Search for application Order Management and entity Order Line
3. Find the attribute Subinventory
4. Define rules to automatically default a subinventory to orders. (See the Order Management Implementation Guide for more details.)

C:  Define subinventory picking order. In the absence of any defaults in shipping parameters and any subinventory specifications on the order or pick release form, pick release will look first at the subinventories which have priority 1. If no available quantity is found in any of these subinventories, then pick release will look next at all subinventories having priority 2. Process will continue until all subinventories which have a priority defined have been examined for sufficient on-hand quantity.

1) As the inventory user, please navigate to Setup->Organizations->Subinventories
2) Search the primary subinventory in which your items exist
3) Open this subinventory.
4) In the field Picking order, enter a value of 1. This will be the subinventory which pick release will be examined first to see if sufficient quantity exists, when you do not specify a subinventory on the pick release form.
5) Repeat these steps for each of the subinventories which will have all of the items that will be picked on your sales orders. You may assign all of these subinventories to the same priority (1), or to different priorities if you want to implement a prioritization requirement.
6) Test this setup by entering a new order having items which exist in different inventories. Note that all items must exist in one of the subinventories you modified in steps 2-5.

3-Improper set-up of the Sales Order  Key Flexfield in Inventory

In addition to the inadequate supply error, the following error also occurs in the pick release log file:
No Mtl_Sales_Order ID found for OE Header

Solution:
1) As the Order Management super user, navigate to Setup>>Financials>>Flexfield>>Key>>Segments
2) Ensure that the Sales Order Key Flexfield segments --Order Number, Order Type and Order Source are mapped to Segments 1 , 2 and 3 as follows: 
  +  Segment1-Order Number
  +  Segment2-Order Type
  +  Segment3-Order Source
3) Also ensure that the profile option OM: Source Code is set to 'ORDER ENTRY'

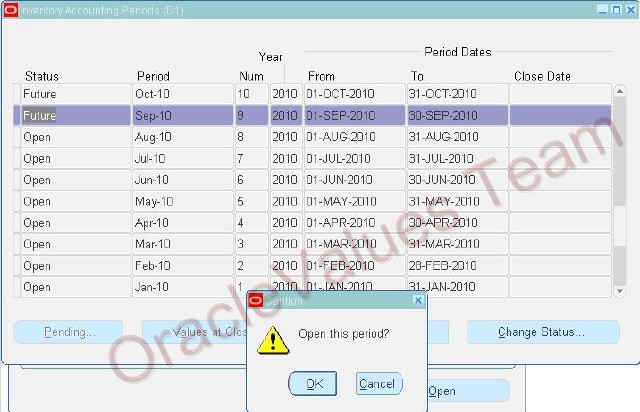
4-No open period exists for pick release

Solution:
Use either options A, B, or C

A. Open the inventory accounting period for the period in which the order is scheduled to ship.
1) As the Inventory user, navigate to Accounting Close Cycle->Inventory Accounting Periods
2) Select the period to be opened. Its current status should be Future
3) Click on the change status button.
4) A small dialog box asks if you want to open this period. Click on Yes.

B. Change the requested date on the order to a date within an open period
1) As the Order Management super user, navigate to the Sales Orders form
2) Go to the Line Items/Shipping tab.
3) For each order line, change the requested date to a date which is in an open inventory period.
4) If the scheduled ship date does not automatically change to a date within the open period, then also change the scheduled ship date.  
Note that the scheduled ship date may be driven by defaulting rules (navigate to Order Management->Setup->Rules->Defaulting)

C.  Transact the move order in the open period.
1)  As the Order Management super user, navigate to the Pick Release form.
2)   Pick Release the order. Specify Auto Allocate as NO, so that move orders will not be automatically transacted.
3)  Switch to the Inventory user
4)  Navigate to Move Orders->Transact Move Orders, and find the Move order for this order.
5)  Allocate the move order
6)  Click on the View/Update allocations button
7)  In the form which follows, reset the date on the move order to a date in an open period.

NOTE: If the order was initially scheduled to ship during a period which is now closed, only options B and C are available. Once a period has been closed, it cannot be re-opened.

5-Partial shipment did not occur, because order line/lines are in a ship set

When a single order line is on a ship set and enforce ship sets is specified., the entire quantity must be shipped. System will not split this order line, and will not create a backorder for the amount of the shortage.

When multiple lines are on the same ship set; if one line has insufficient quantity, none of the other lines will be pick released either. In this case, the pick release logfile and/or shipping exceptions report will show error message "Item 1234 is on a ship set, and item 2345 on the same ship set has insufficient quantity"

Solution:
Use either options A or B. Use option C to verify no unintended ship set defaulting is occurring.
A. Remove the line with insufficient quantity from the ship set
1) As the Order Management user, navigate to the Sales Orders form.
2) Find the order you are attempting to pick release
3) Go to the Line Items/Shipping Tab.
4) Remove any value in the field ship set

B. Uncheck the 'Enforce Ship Set' parameter in the Shipping Parameters screen
1) Navigate to shipping->setup->shipping parameters
2) Go to the Pick Release tab
3) Uncheck the box labeled Enforce Ship Sets and Ship Models

C. Review Order Management defaulting rules for entity 'Order Header', attribute 'Line Set'.
1) Navigate to setup->rules->defaulting
2) Select application Order Management, and Entity Order header
3) Find attribute Line Set
4) Click on the Defaulting Rules button
5) Review the Default Sourcing Rules to understand when lines may be defaulted to either a ship set or an arrival set.. Remove any of these sourcing rules which are not appropriate for your business.

6-Item was setup as Locator Control, 'No Locator specified during pick release, and no default locator exists
Solution:
Set up a default locator for the item in the Inventory Item transaction defaults as follows:
1) Navigate to Inventory -> Setup -> Transactions -> Item Transaction Defaults
2) Click New, click the Locator tab, click New again
3) Enter your item,
4) Enter a type of Move Order Receipts
5) Enter the Subinventory and the Locator you want to use as the default


7-Subinventory specified as Release Criteria.
In the "Release Orders for Picking" form, Inventory tab: there are two different fields for subinventory.

I. Under Release Criteria. If a subinventory is specified here, no order line will be considered for picking unless that subinventory has been explicitly specified on the sale order line, line items/shipping tab. . Orders lines which have a NULL value in the subinventory field will not be picked. The subinventory field is not normally visible in the line items section of the Sales Orders form; it must be displayed by using folder->show field. Most users will not see a subinventory field on the line items/shipping tab, and will not select a subinventory; thus, specifying a subinventory under release criteria will exclude most order lines from consideration for pick release.

II. Under Pick From region at the bottom. If a subinventory is specified here, but not under release criteria, then there will be no eligibility for picking exclusion based on subinventory. Pick release will look only in this subinventory; if sufficient quantity is not found here, pick release will not consider any other subinventory and will report insufficient quantity.

8-Pick Release using a Pick Release rule picks nothing, same criteria specified without the pick release rule succeeds
Cause:
1. An order was specified which has a future scheduled ship date or request date.
2. The Scheduled Ship or Request TO dates defaulted to today's date when the release sales orders for picking form was opened.
3. User did not null out these dates.
Solution:
When attempting to pick release orders with future scheduled ship dates, insure that the "TO" schedule ship date in the pick release form is either nulled out, or contains a date future to the scheduled ship dates on the orders to be picked

9-Specified data range exclude the order being picked
Solution:
1. Navigate to Shipping->Setup->Picking->Define Release Rules Form
2. Query the Pick Release Rule in the Define Release Rules form.
3. Remove the warehouse value
4. Enter the same value again. (Which takes latest ship from location value associated to that warehouse).
5. Save the record

10-Delivery detail has already been assigned to a delivery
Solution:
This issue is resolved by checking the check box "Include Assigned Lines" on the shipping tab of the Pick Release form.


(Oracle metalink - Note 863761.1)

Thursday, September 16, 2010

Internal Order Process in Oracle Order Management

In multi-site companies, One of common business practices is internal fulfillment. There is two common
scenarios that need Internal-Fulfillment from another operating unit:
  • Manufacturing facility is centralize but has multiple distribution sites.
  • Manufacturing operations are spread out from many locations.
The demand can come from marketing plan of distribution sites or by min-max planning at source organization. In Figure below, Vision Singapore (Ledger Singapore) is a distribution operation unit. Singapore Distribution Center(S2) follows the sales plan, it need to replenish the good from Seattle Manufacturing (M1)
The Internal Orders process content following step:
  1. According to Sale plan, Vision Singapore(VS) creates an internal requisition. This internal requisition is transferred as internal sales order for Vision Operation (V1)
  2. Vision Operation pick releases the internal sales order to Seattle Manufacturing (M1)
  3. M1 ships the goods to S2. S2 receives the goods.
  4. V1 issues an AR inter-company invoice to VS at transfer price.
  5. VS issues an inter-company payable to V1.
OracleValue Team


.

Wednesday, September 15, 2010

Oracle E-Business Suite R12.1.3

Announced at AUG-2010 Oracle E-Business Suite 12.1.3 is now available for download.

Oracle EBS R12.1.3 combines maintenance patches(RUP) and can only be installed on an existing EBS 12.1 environment. which combines error corrections, regulatory updates, and functionality enhancements into a consolidated, suite-wide patch set.

Several product family RUPs included in Oracle E-Business Suite Release 12.1.3 are available individually and might contain conditions and prerequisites that apply to its application (Ex: Supply Chain Management, Financials, CRM and Value Chain Planning,...). Compare to Release 12.1.1 and 12.1.2 had a lot more functionality that we would be interested in all.

Some new features:
  1. Accessibility: Keyboard-only users should set their Accessibility mode to "Standard" to ensure that the keyboard-only accessible version of user interface enhancements introduced in Oracle E-Business Suite Release 12.1.3 are enabled.
  2. Confirugable Home Page: The Configurable Home page is now enabled by default.
  3. Look Ahead LOVs: New UI indicator if the Look Ahead feature is enabled on a particular LOV field. The indicator takes the form of an angular downward-facing arrow at the end of the LOV input field. Ability to control the number of records to display in the Look Ahead LOV visible area. Standard accessibility for keyboard-only users.
  4. Inline Attachments: Viewing, updating, and deleting attachments inline within an Attachment Table item. Adding attachments inline within a Message Inline Attachment item. Rendering in BiDi languages.
  5. Pop-ups: Allowing a form submit done on a pop-up component to refresh the base page. This enables you to build a pop-up that modifies data on the base page.Rendering descriptive flexfields in a pop-up. Displaying a warning about pending changes when a user tries to close a pop-up. Standard and screen reader accessibility.
  6. Portlets: A link within an Oracle E-Business Suite OA Framework-based portlet can now be opened in a new browser window. This allows the base portal or Oracle WebCenter page to remain in context while a drilldown link in the portlet opens content in a separate window. All Oracle E-Business Suite content will launch into a single window.
  7. Data Export: Data export has been enhanced to allow you to control the export file format and encoding used when you implement an Export button to export data displayed in one or more regions of an OA Framework page to a file.
For more information of this Release, reference:
    * Oracle E-Business Suite Release 12.1.3 Readme (Note 1080973.1)
    * Oracle E-Business Suite Release 12.1.3 Release Update Pack (Patch 9239090)
    * Oracle E-Business Suite Release 12.1.3: Release Content Documents (Note 561580.1)

OracleValue Team

Tuesday, September 14, 2010

Overview Oracle Order Management in Order-To-Cash Life Cycle

Order-To-Cash generally refer to the process that begin from taking customer SO via different channel ( email, internet, sales person, or by some other...), then fulfilling the order, manage shipping to customer. And then generating an invoice and collecting payment for that invoice. (See the picture).


In this Cycle, Oracle Order Management implemented following function:
 - Managing Customer, Customer Class
 - Pricing and Adjustments
 - Enter Order, import Order from Order Module, Book Order
 - Scheduling and Shipping Order (Shipping Execution Module)

OracleValue Team

A brief introduction to our blog

Dear all,


We built this blog for sharing experience, knowledge and news about Oracle products. We hope the information in this blog is useful for anyone to choose solutions for their business, to solve their problems, to learn new knowledge for their jobs ,...etc...

Regrads,

OracleValue Team